1. Install prerequisites
Install the Icom USB driver, then configure the recommended virtual COM ports. Add OmniRig later only if you plan to connect additional CAT applications.
Getting Started
This page explains the basic station architecture, first-time setup sequence, and common integration paths for ShackMaestro and ShackScope.
Overview
ShackMaestro communicates directly with the radio through the physical USB/CI-V connection. Optional virtual COM paths can then let selected station applications communicate through OmniRig or ShackMaestro's configurable Virtual COM Bridge rather than opening the radio COM port directly.
Install the Icom USB driver, then configure the recommended virtual COM ports. Add OmniRig later only if you plan to connect additional CAT applications.
Connect the radio's USB COM port, click Power ON, and verify that ShackMaestro communicates with the radio and that ShackScope is operating correctly.
Connect additional programs through the planned direct CI-V, OmniRig, and/or virtual COM paths. Common examples include WSJT-X, Log4OM, SDR Console, Fldigi, SDR Uno, N1MM+, HRD Logbook, GridTracker, and DXLab.
First-time setup path
For the least confusing setup, work through the steps in this order. Start by confirming ShackMaestro can talk directly to the radio, then add ShackScope, OmniRig, and other station programs only as needed.
Install the Icom USB driver before connecting or configuring ham radio software. After installation, Windows should expose the radio as a COM port. Open the Icom USB driver page.
Connect the Icom radio to the PC using a USB cable. Use Windows Device Manager if needed to identify the assigned COM port.
Virtual COM ports allow additional applications to communicate with the radio through ShackMaestro. They are not required for ShackMaestro and ShackScope themselves, but are recommended before adding software such as OmniRig, Log4OM, WSJT-X, SDR Console, GridTracker, or MMSTV.
Install ShackMaestro, then select the physical radio USB COM port and baud rate in Radio Settings.
Click Power ON in ShackMaestro. Verify that ShackMaestro displays the radio frequency and operating state, and that ShackScope is receiving spectrum data from the radio.
After the default setup is working, use General Settings to create additional Operators if you want separate configurations for another operator, radio, station arrangement, or test environment.
Typical configurations
For the current release, first verify ShackMaestro can communicate directly with the radio. Then add ShackScope, OmniRig, and other station programs only if they are part of your station setup.
Best first milestone: ShackMaestro owns the physical USB connection to the radio and verifies CI-V communication.
Best for operators who want enhanced spectrum/waterfall display and meters without adding third-party CAT applications yet.
Best for operators who use ShackScope plus digital modes, logging programs, SDR software, or other applications with shared CAT control.
Key concepts
Most setup problems come from COM port conflicts or uncertainty about which program is supposed to talk to which port. These concepts help explain the pieces.
CI-V is Icom’s radio-control protocol. ShackMaestro uses CI-V to read and control radio state such as frequency, mode, filters, radio settings, and scope-related data.
ShackScope is the companion spectrum, waterfall, and meter application. It is part of the normal ShackMaestro installation and can be verified before adding optional CAT-sharing tools such as OmniRig.
Virtual COM ports are software-created serial ports that let one application communicate with another. They are useful for routing CAT data to optional station software without letting multiple programs open the physical radio COM port directly.
OmniRig is commonly used by ham radio applications as a CAT sharing layer. It is optional for ShackMaestro. If you use OmniRig, it should connect to ShackMaestro through the configured virtual COM pair rather than opening the physical radio COM port directly.
Operators let ShackMaestro keep separate configurations for different users, radios, stations, or testing setups. Each operator can have its own macros, programs, radio settings, layout preferences, and related JSON configuration files.
Setup guides
After reviewing the overview above, use these focused guides to configure each part of the station one step at a time.
Install the driver, connect the radio, and identify the correct Windows COM port.
Create the virtual COM pairs used by optional CAT-sharing paths and other station programs.
Verify the companion spectrum/waterfall app after ShackMaestro can communicate with the radio.
Configure OmniRig only if you want to use it as the CAT-sharing layer for compatible station software.
Confirm startup paths and startup order for WSJT-X, Log4OM, SDR Console, optional OmniRig, and other station software.
Radio setup
The values below are common starting points for ShackMaestro. Your station may require adjustments depending on existing software and radio configuration.
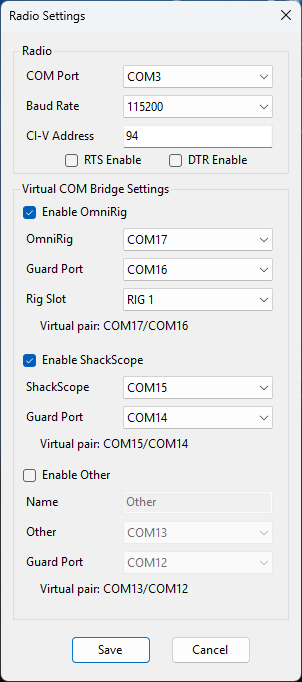
Use this dialog to confirm the radio COM port, baud rate, CI-V address, and the virtual COM paths used for ShackScope, optional OmniRig, and other bridge connections.
| Radio setting | Common value | Notes |
|---|---|---|
| CI-V Baud Rate | 115200 | Match this in ShackMaestro. |
| CI-V Address | 94h | Default IC-7300 CI-V address. Check your radio's documentation for the correct CI-V address and USB settings if you are using a different model. |
| CI-V Transceive | OFF | Recommended for this shared-CAT setup. |
| CI-V USB Echo Back | ON | Recommended for USB CI-V communication with ShackMaestro. |
Why it matters
Once the station is configured, ShackMaestro can send a coordinated group of radio-control commands with a single Profile macro click.
The default SSB Ragchew profile can quickly move the radio into a comfortable voice-operating setup, including related controls such as power, noise reduction, monitor, preamp, AGC, and other operating preferences.
The default Digital - FT8/FT4 profile can quickly prepare the radio for digital-mode operation, reducing the chance that one setting is forgotten when moving between voice and digital workflows.
Troubleshooting
These checks solve many initial setup problems before deeper troubleshooting is needed.
Confirm the Icom USB driver is installed, the correct COM port, baud rate, and CI-V address are selected, and no other program is locking the radio port.
If you use OmniRig, confirm it is installed, enabled in ShackMaestro, and using the intended virtual COM port, baud rate, and radio type. If you do not use OmniRig, disable it in ShackMaestro Radio Settings and remove it from any profile/program startup list.
Confirm ShackMaestro is running, verify the configured virtual COM path, and try Settings → Restart Scope.
Next steps
Once ShackMaestro is communicating reliably with the radio, add integrations one at a time. This makes problems easier to isolate and keeps the setup process manageable.
The full manual covers installation, settings, operation, ShackScope, and detailed usage notes.
The screenshots page shows the main application windows, settings, macro editor, and ShackScope displays.
For setup help or beta feedback, include your radio model, Windows version, COM settings, and relevant screenshots or logs.